 PeteFree.com
Lastolite EZbox Studio Soft Box — 36x36 Inch (91x91 Centimeter) — Review
© 2013 Peter Free
23 May 2013 (revised 31 May and 08 June 2013)
Not so good
Studio photographers will probably find that Lastolite’s EZbox studio model softbox in the 36x36” (91x91 centimeters) is more hassle than it is worth.
The one positive
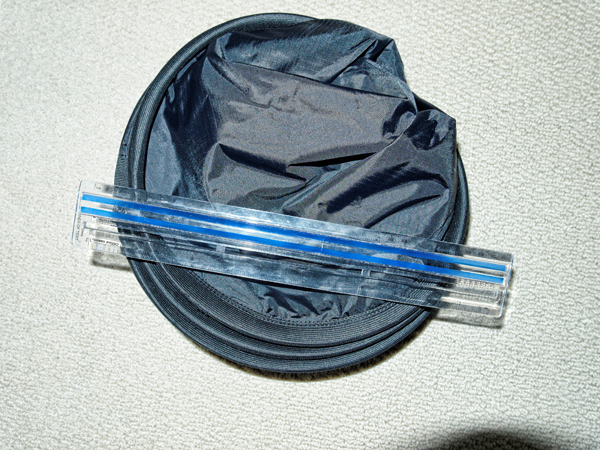
Once you take the removable front and inner diffuser panels out, the EZbox collapses easily.
In essence, the EZbox is constructed from four collapsible triangular reflectors sewn together. There is an opening at the strobe end for the flash tube and modeling light to poke through. The softbox folds identically to a collapsible reflector.
The easiest way to fold it is to push on apex of the triangle against the base of a wall and, holding the long ends of the triangle, bring your hands together toward the mid-line. If you cross one hand below the other at the end of your folding arc, the box will begin to collapse. Reach down and bring the hanging circle up to the top circle, press together, and place the box back in its bag.
BUT — poor design and cheap hardware
The trouble begins because of the collapsible design.
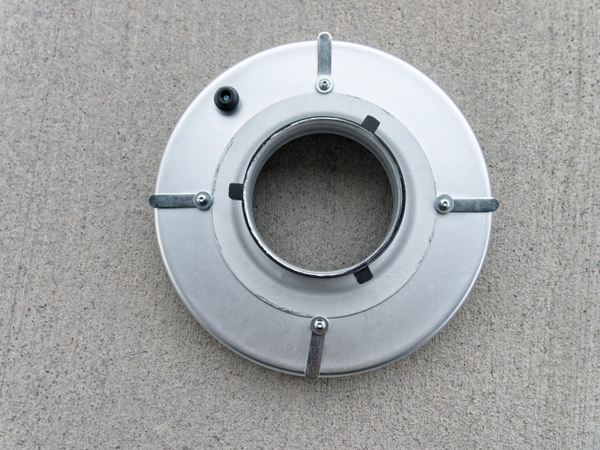
The box mounts onto a grooved aluminum speed ring/plate that is shaped somewhat like a bowl. The box uses spring pressure, generated by its spring steel frame, to clamp into the groove.

To fit the assembly onto individual brands of studio strobes, you will have to buy a separate Lastolite adapter, which attaches to the grooved mounting plate.
One problem here is that the included aluminum bowl-like plate and the additional aluminum adapter are both cheaply constructed. Taken together, they remind me of a child’s $5 toy. I noticed that the edge of my Bowens adapter began warping, when I tightened the bolts that attach it to the provided mounting plate.
Assembly of the ring and adapter is an exercise in engineering stupidity
Assembling the adapter ring to the grooved mounting plate is a bit more frustrating than a thoughtful engineer would have made it.
There are four short slots cut into the provided plate. Lastolite wants the user to thread a tiny bolt (with two washers) through a small (flat and very narrow) rectangular washer — through a hole in the grooved bowl-like plate — and tighten the other end of the bolt with an equally tiny washer and cap nut. All this hardware is smaller than ideally suited to its purpose.
That might have been acceptable, had Lastolite thought to provide marking on the plate so that one could properly center the adapter ring. Without such guidance, the user has to assemble the contraption from the backside, and then flip it over to see whether the adapter is centered correctly.
In view of this design stupidity — and/or the instructions’ failure to guide the user — the best way to assemble the contraption is to attach the mounting washers and cap nut the tight enough to keep them from falling apart. They do not yet have to be holding the adapter plate in position.
Then flip the mounting plate over, so that you are looking at the underside of the adapter ring. Because its hole is smaller than the mounting plate hole, you will want to adjust the adapter ring so that its hole is centered on the center of the hole in the grooved mounting plate.
Because the plate is upside down, while you are doing this centering, gravity will have dropped the adapter retaining washer down on the bolt shaft. If you haven’t tightened the bolt-washer assembly too much, gravity’s effect on the retaining washer will give you enough to slide the bolt and washer assembly inward — against the adapter ring — without being able to see where the washer is. Hand tighten the cap nut (which you are able to see).
Repeat the hand tightening process with the bolt and washer assembly directly across the plate from the one you just tightened. Then do the other two.
Flip the plate back over, so that you can see the hex key wrench bolt heads, and finish tightening the bolt heads with the 2.5mm hex key wrench that came with the kit.
You will have to crank the bolt-nut assembly super tight, so as to everything from sliding apart.
What are the rectangular washers on the adapter plate supposed to do?
These are apparently supposed to project slightly outward, beyond the edge of the grooved mounting plate.
From what I can determine, they were intended to keep the EZbox from sliding out of the plate’s groove in the backward direction.
This design causes problems with Bowens/Calumet S-2 (bayonet) mounts.
The minor problem for Bowens/Calumet S-2 users
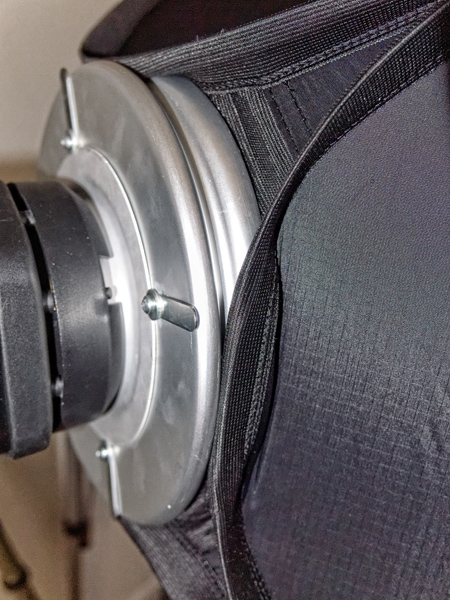
The S-2 is a bayonet mount. That means that once the ring assembly is in place on the strobe, it cannot be rotated so as to properly align the above rectangular washer prongs with the EZbox edges. You will see in the below picture that the bayonet rotation moved the washer projections some distance beyond where they were supposed to go.
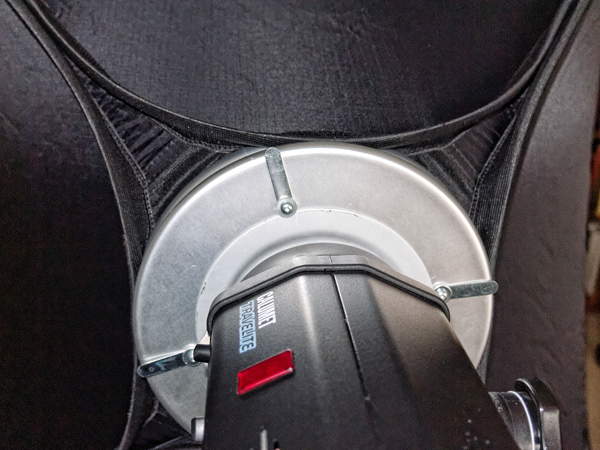
Fixing this would require measuring how far the adapter prongs on the Bowens S-2 mount are beyond the proper position and reassembling the grooved plate/adapter ring assembly to orient the prongs accordingly.
Given how much of a pain in the posterior the original assembly was (given the inadequate dimensions of the included hardware), I decided not to bother.
This is probably not a big deal because the spring tension of my newish EZbox was enough to keep it in the groove. But it does show that someone at Lastolite was not thinking.
Mounting the box to the ring plate is also an exercise in dubious engineering — given the size and weight of the box
This is a Mickey Mouse mounting system (from a studio photographer’s perspective) that appears to have been originally designed for Lastolite’s Quad Bracket for EZbox. The bracket mounts four camera hot shoe style speedlights.
In its studio strobe persona, there are two ways to mount the box to the grooved mounting plate — either to the plate already on the strobe or to the plate first and then onto the strobe.
The latter method works significantly better.
If you attempt to mount the box to the plate already on the strobe, be prepared for the following. The box-end opening is narrow. While you are attempting to pull the heavy softbox over the adapter assembly and into the mounting plate’s groove, you cannot help but wonder what you are doing to the strobe unit’s modeling light and flash tube. Which of course, you cannot see.
I found it preferable to mount the plate to the softbox while the box lay face down on the floor. Once the box ends were in the groove, I could pick the assembly up and slide the adapter plate into the bayonet mount on my Bowens Calumet strobe. This is easiest to do, if you support the plate in one hand and reach over and across the box to control it by grabbing onto the far side triangular panel edge.
Demounting and disassembly
If you demount the box from the plate while it is still on the strobe, you will have to be careful not to let the edge of now loose box whack into modeling light and flash tube.
The same is true if you leave the plate attached to the box and take both off the strobe as one unit. With the Bowen Calumet bayonet mount, this is more difficult than it was to mount it. That is because one has to use one hand to slide the bayonet lock toward the back of the unit, while simultaneously rotating the adapter plate assembly counterclockwise (as seen looking into the strobe face). Mounting does not require doing anything with the locking latch, so you have both hands free.
To collapse the box, you first have to remove both diffusion panels. Given how badly mine fit, this is an added annoyance. And the required removal process somewhat defeats the point to having a collapsible box. For example, my 7 foot Chimera strip box folds up with both panels (the outer of which is sewn in) in place.
Manufacturing flaws on my sample added to my dissatisfaction
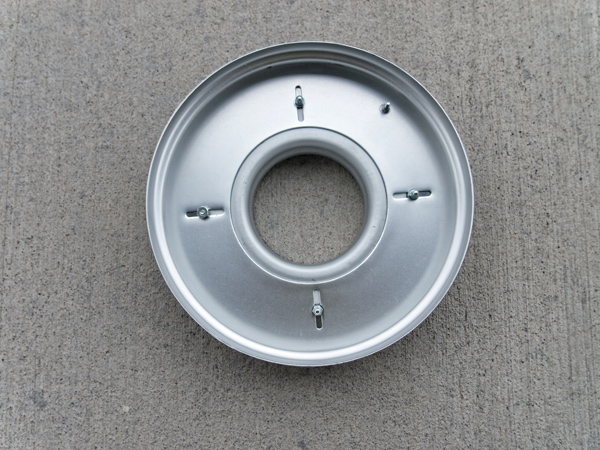
My box came missing one of the mounting plate nuts. The threads on the tiny bolts are not a common twist, so I had no proper replacement on hand. The flat nut that you see in the picture probably stripped the bolt threads.
The inner diffusion baffle, which Velcros to the inside of the box, was much too small. I had to serially stand on each corner and stretch the fabric diagonally in four directions. Even then, it barely fit and kept popping loose.
Note — how I was able to fix this
In looking at the too small inner diffuser (baffle), I recognized that the fabric was probably correctly sized — presumably having been the result of a mass manufacturing process.
Instead, the Velcro “hook” rectangles, which are attached to the corners of the baffle, were not projecting as far from the diffuser’s corners as the designer had intended.
Each of these prongs is a rectangular strip of stiff, coarse Velcro hook material. The rectangles are folded in half over the diffuser material, at each of the baffle’s four corners.
The sewer had pushed the folded over Vecro sandwich too far into each corner and sewn it there. As a result, all four “prong” directions were too short to make a firm attachment to the receiving patches sewn into the box.
I fixed this by using a seam ripper to detach the sandwiched Velcro pieces, then resewed them farther out on each of the corners. By extending these prongs, the baffle now attaches as intended.
In contrast, the outer diffuser is too big.
Whether that is the result of having slightly too much material or putting the Velcro hook strip too far out along the diffuser’s periphery, I don’t know.
Even when fastened to the very outer perimeter of the mounting strip that is sewn into the box, I was left with a foldover and a corner projection at the bottom.
The Velcro strip on the outer diffusion panel runs completely around the panel and, being too big, its curved corners are in the wrong places. So, one cannot evenly dispose of the excess height and width.
Given these glitches, I found that it is easier to put both inner and outer diffusers on with the box lying open and face up on the floor.
Note
Lastolite’s promotional YouTube videos show professional photographer Mark Cleghorn attaching the diffusers only after the EZbox is on the speedlight Quad Bracket and on the light stand.
Light performance
I have not used this box enough to render a fair judgment on its output.
Initially, I do not like it as much as a larger Chimera that I use. But that may mean nothing, off the cuff judgments being what they are.
The light output is certainly acceptable.
Last, a truly crappy instruction sheet
My box with a single sheet of diagrammed instructions, without any text. The tiny hardware packet contains a separate small diagram showing the appropriate washer layering, but its portrayal conflicted with that on the main diagram.
Neither sheet informs the user how to mount the box to the plate.
All told, this was another display of corporate imbecility.
Considered conclusion — the 36x36 inch Lastolite EZbox is not recommended for ordinary studio use
I will probably not be using my large EZbox, unless I evolve into having enough studio space to leave it permanently mounted to a strobe.
I found the design too irritatingly cumbersome to mount and demount. And, once mounted, the weight of the box makes it appear to flop around more than conventionally mounted softboxes. This large EZbox sags just enough to require tilting my monolight slightly backward. On a boom, the sag is even more annoying.
The 36x36 inch EZbox design appears to be an offshoot of the company’s smaller, lighter, and bracket-specific hot shoe-mounted units. In the studio, I think that its significant negatives outweigh its collapsibility virtue.
Overall, I was not impressed by this product’s manufacturing execution or its mounting hardware.