 PeteFree.com
Hoist V5 vertical home gym — solo assembly tips — a 'how to' review — intended for PCSing military members
© 2017 Peter Free
23 September 2017 (updated 21 May 2019)
Update — 2 points
First
For people who want to try moving the Hoist Fitness V5 — without a major disassembly — see my new article here.
Second
With regard to the following (September 2017) how-to, I have had to remove the URL links that I had previously incorporated into the text. During the interim, Hoist changed them.
Because I no longer trust their webmaster to be consistent, I now walk you through how to get to Hoist's V5 Owner's Manual:
Go to www.HoistFitness.com.
Mouse over (but do not click on) "Support" in the top menu.
Notice the sub-menu that pops up as your mouse hovers.
Click on "Customer Downloads" from that horizontal list.
Look for "Archived Owner's Manuals".
Click in the "Choose" box and scroll to the very bottom of the list to find the V5.
Select and click it. A PDF downloads.
All the below references are to this V5 PDF manual.
Caveat — what follows may upset safety-minded readers
If you never work on heavy things or in potentially dangerous situations by yourself, this blurb is not for you.
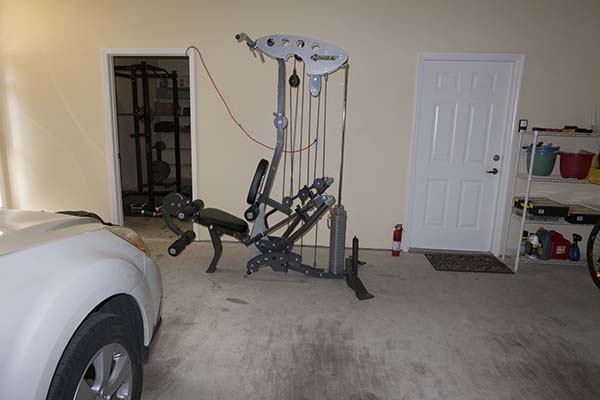
Second, the photographs inserted into the below text show the Hoist V5 gym without its "shield assembly." Those are the metal shrouds that keep small hands and other appendages out from between the gym's moving weight plates.
After multiple set-up and tear-downs of this gym, I got so irritated with the cumbersome way that these shields attach to the unit that I stopped installing them.
Survival of the fittest and all that.
From a maintenance perspective, the installed shield assembly also makes it more difficult to keep the weight column clean and properly adjusted.
The gist — vertical column plate gyms (like the Hoist V5) are a pain to move — but the tedium may be worth it
If you PCS a lot, most vertical plate gyms are going to be a nuisance to take with you.
However, the V5 has been so functionally excellent for my wife that we continue to cart it from one PCS to another. The Hoist gym has allowed her to max Air Force fitness standards without the risk of free weight injury.
Hoist no longer manufacturers the V5. Yet, the consensus seems to be that it remains one of the finest vertical stack home gyms ever produced.
Hoist product support is exceptional — even for units no longer manufactured
Movers at the American end of our last PCS managed to lose both weight plate guide rods and their hardware. Hoist had V5 parts in stock, and it responded immediately to emails requesting part numbers and prices. I received the ordered replacements within a week.
I cannot recall another manufacturer with such efficient service on a product that it no longer produces.
I have assembled and disassembled the V5 five times — working by myself
Some of assembly design decisions on the V5 are unhelpful, as assessed from the perspective of someone having to put it together or take it apart multiple times. These design shortcomings make the V5 more difficult to physically relocate than necessary.
Hoist's V5 owner's manual is helpful — but flawed
The manual apparently was intended for essentially one-time-only assembly by knowledgeable vendors. In the case of repeated builds (as will be necessary if one PCSs a lot) the manual gets some steps backwards from convenience's perspective. The book also occasionally fails to point out that some steps have to precede others.
This instructional negative is the result of the manual's failure to show the complete assembly process from start to finish. The manual understandably focuses on major steps, disregarding those that "magically" take place in the part-by-part diagrams located at the back of the pamphlet.
That said, the V5 manual is far better than most.
Particularly useful are its exhaustive parts lists. Not only do the parts have numbers, they have specified names. One cannot go wrong in describing what one needs from Hoist. Well done.
The gym's key assembly design fault
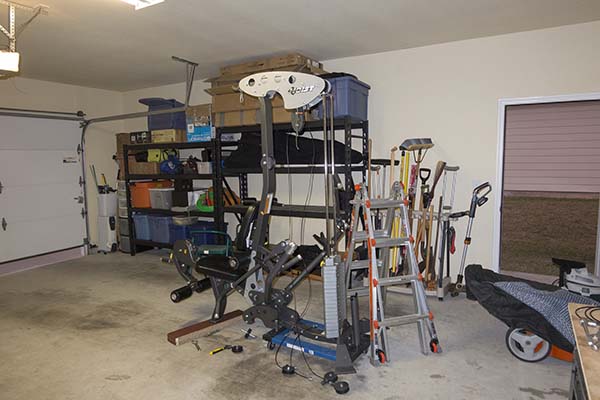
The V5 cannot conveniently load (or unload) its weight stack as a last step.
This means that moving a fully assembled V5 from one "geography" to another is so difficult as to be prohibitive under most circumstances. I am guessing that the total unit weighs somewhere around an awkwardly distributed 400 pounds (182 kilograms).
The plate stack alone weighs 200 pounds (91 kilograms). There is no convenient way to lift and move the plate end of this unit with the gym framework still attached.
Another shortcoming
Some of the gym's assembly cannot be completed, unless one raises the unit several centimeters off the floor. For example, the two weight plate guide rods bolt to the frame from the bottom of the unit. See owner's manual at pages 7-8.
To get a socket or open-end wrench onto the guide rods' attaching bolts, one has to lift that end of the gym onto blocks.
Hoist also puts this step first in the assembly process. I would have designed it to be last — with a more intelligent bottom design, of course — so as to make it possible to move the framework without the added mass contributed by the weight stack.
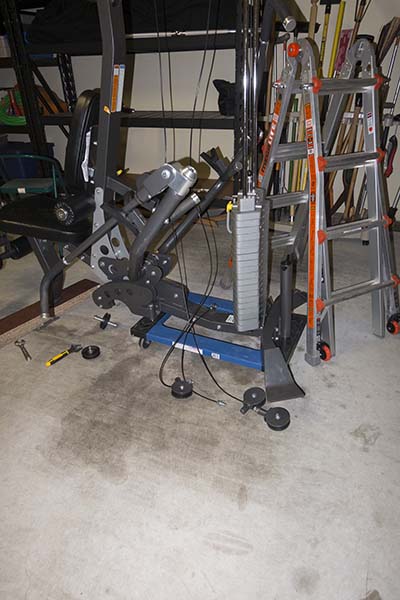
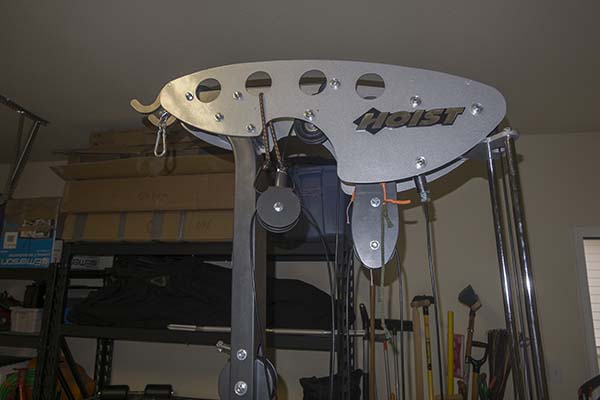
The key glitch — the "top main frame assembly" is poorly designed
The "top main frame assembly" is a heavy metal arch that connects the weight stack guide rods to the "main upright assembly" post (which supports the seat and seat back).
You can see both of these parts at manual pages 12-16 and 61.
The arch (which Hoist calls the "top main frame assembly") is noticeably heavy. It attaches to both guide rods and to the "main upright" post with 4 bolts. Two on each side.
In addition to being awkward to hold up by itself, the arch ultimately supports the weight of all the pulleys and cables. This design means that someone assembling the unit has to perch the arch atop (a) the two wobbly guide rods and (b) the main upright post, which is also comparatively narrow.
For safety, I stand on a ladder to hold the arch in position. One can tentatively prop it in place, without having to continuously hold it up. Just don't shake the gym, or it will fall down. That's happened to me a time or two. The arch is heavy and sharp enough to do real damage, if it hits you on its way down.
The main culprit in this hazard is the wobbly guide rods. Before the arch is attached, they are supported only by two bolts at their bottom ends. Being about 6 feet (1.8 meters) long and noticeably hefty, the rods move around until the arch is bolted to them.
A better way?
If one could easily remove the weight stack — with the arch securely perched in its overhead position — moving the gym would be very much easier. There is a big difference between moving 200 pounds in individual plates and relocating a very much larger and awkwardly shaped unit that weighs about 400 pounds.
Additionally, one cannot conveniently leave the gym's cables and pulleys in position, when trying to move the gym from one home to another. This means that you will have disassemble at least some of the pulley assembly every time you change geographic assignments.
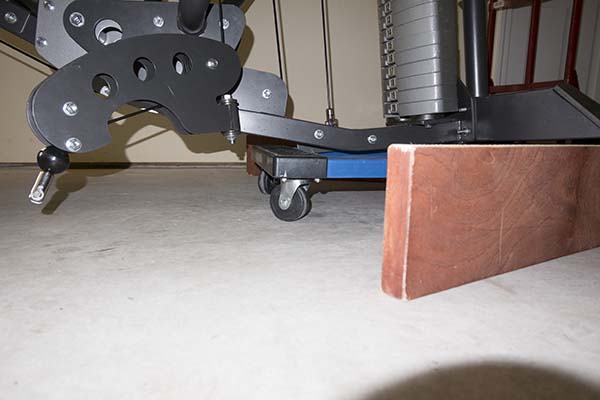
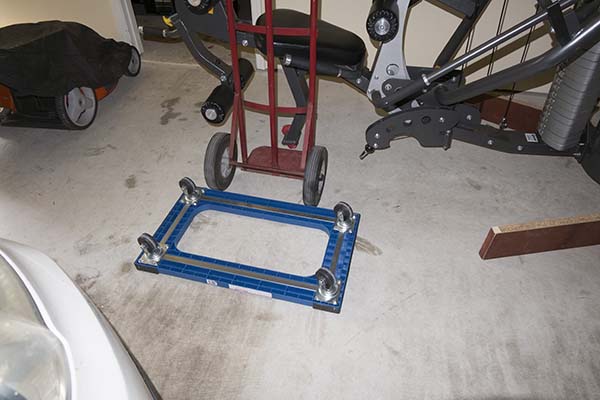
Solo assembly — use a furniture dolly and wood blocks
Working alone, it is easiest to assemble the weight-bearing end of the gym frame on a furniture dolly.
I used one with a hole in its center. The open space allowed me to reach the bolts that attach the bottom of the weight plate guide rods. Scrap wood, placed under the seat end of the other end of the unit keeps the gym from markedly tilting out of the horizontal plane.
The dolly will allow you to move the unit to its final place in the room by yourself. The seat end is light enough to lift with some effort. You can push the V5 around with its weighted end resting on the dolly, while lifting the gym at its seat end. Steer the dolly from the seat end.
You will usually need a dolly to move the gym, even when two people are available. Although 400 pounds is not all that much weight, there are no convenient places on the V5 that allow one to efficiently exert one's strength.
Keep the correct assembly sequence in mind
The owner's manual leaves out some assembly steps. And I have used different disassembly sequences in the past. If I forget what I did (and when I did it in the sequence), I sometimes leave myself booby traps for the next assembly.
For example, I am writing this after having left the gym in storage for 3 years (while we were abroad). I had disassembled the unit more thoroughly than usual, so as to make it easier for the movers to store it. This meant that I had disconnected some items (like the grab bars for the leg extension) that I usually leave attached to the unit.
When I reassembled the V5, I forgot the grab bars until too late in the process. That meant that I had to take the seat off the fully assembled frame. Removing the seat after the gym is fully put together is a real PITA:
You have to slide under the already low frame even to see the seat bolts, which are also inconveniently located inside the hollow frame tube.
Then you have to move the leg extension cable out of the way to put the bolts and their holes into proper alignment. If you drop one of the bolts inside the frame tube, good luck getting it back out.
Hoist could have designed this more ably with just a little foresight. If you assemble the V5 as often as I have, you will notice design shortcomings that could easily have been avoided with a little more 'real world use' anticipation.
Assembling the V5's press arms — see manual pages 17-18
Arm assembly has always been a struggle (for me) working alone. There are two ways to attach them:
You can leave their pulley assembly attached to the frame and remove the arms from that. Because the pulley assembly floats, removing one arm means that you have to wrestle with it, while the pulley assembly shifts underneath. Given that there are three bolts to attach per arm, this balancing act requires determination.
The manual has you do the reverse of this. You attach the arms to the still unattached pulley assembly. This is difficult enough in itself because the pulley assembly is an odd shape and tilts in unhelpful directions on the floor. I have to block-prop the pulley, as well as the arm to get things aligned enough to slide the bolts in.
Afterward, you mount the completed arm assembly to the gym frame.
This final mounting step means that you are now handling the weight of both arms, as well as pulley assembly. This total mass is significant and awkward to control.
I have done the arm assembly both ways. Both are tedious.
It does not help that the bolts, nuts and washers are difficult to reach (and in an already tight place), while one is attempting to keep everything properly aligned. A second person would make things easier.
Cables and pulleys
Some pulleys have to be disassembled to route the cables. Others do not. The manual is not clear in this regard. Those pulleys that do not require disassembly have a cable-retention bolt at the front or back edge of the pulley. These bolts have to be removed, so as to get the cable into the pulley's groove. The bolts' purpose is to minimize clearance between pulley and cable, thereby preventing the cable from hopping out of its groove.
The manual is not helpful, when it comes to figuring out how to support the pulleys, while getting everything hooked up. The major pulley assemblies are heavy enough that you do not want them falling onto anything vulnerable. I supported a couple of the key ones with string and a bungie cord.
Putting the pulleys into their approximate final positions (in this string-tied manner) is helpful in accurately visualizing the cable routes that you are trying to achieve. The manual diagrams all show the gym pulleys in a positionally assembled state.
Stringing the pulleys up also allows one to get the pulley bolt heads properly oriented. Meaning with their heads all facing one side of the gym. This does not matter functionally, but it does show that the assembler was paying attention.
Should you separate cables from their pulley assemblies — when taking the V5 apart?
There are five V5 cables.
For our first PCSs, I left much of the entire assembly intact. But over time, I found that inevitable twists and loops made a mess of things. It became difficult to attach the tangle to the gym correctly.
Here, the V5 manual's cable routing diagrams are useful. Some of them are unnecessarily confused by showing other cables as well. But if you look closely, you will figure the proper paths out.
The diagrams helpfully show what each cable's ends look like. Each cable has a different configuration. This means that you can take the gym's entire pulley and cable assembly apart, without having to mark anything.
I now think that disassembling most of the cable assembly (with each PCS) is the most efficient way to go. Doing so requires more work, yet it makes routing and adjusting cable tension easier.
Two of these cables — the manual says — should be attached starting at a specified end
I found, however, that I could attach cable 3 from either end. This one eventually routes through the "swivel pulley assembly" located at mid-base of the frame. See manual page 27. The manual recommends starting cable 3 from the main upright.
Having routed cable 3 from both ends, I think that beginning the routing with the swivel pulley (contrary to the manual) is easier. This is because a welded swivel pulley strut makes routing the cable more difficult than it should be. (Designing this, I would have used a removable bolt in the strut's place, instead.) If you end the routing with the swivel, you may find things more difficult to complete due to having less cable slack.
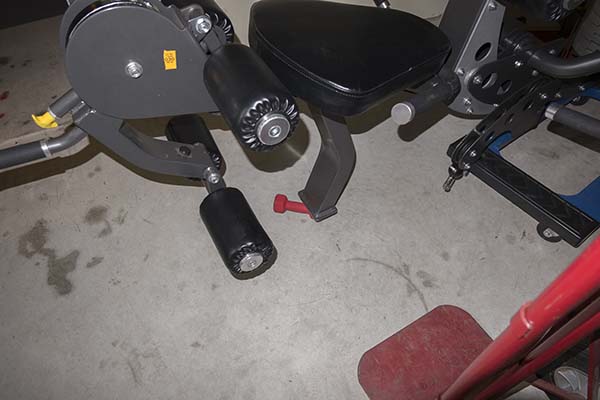
Leg extension cable — not easy to place
Installing the leg extension cable poses three challenges:
First, the proper path is not clear on the frame, without first closely looking at the manual's diagram.
Second, two of the leg extension pulleys are unhelpfully positioned. See page 31 of the manual to orient yourself.
The problem here is the small pulley (which sits second from the end of the leg extension chain of pulleys). It is the one still held inside the hollow frame of the gym. The last one sits outside the frame.
If (a) you uninstall this second to last pulley (which you must to get the leg extension cable into its groove) and if (b) you lose your grip on it (which is easy to do with large hands) — the little sucker will roll down inside the frame and stop at the third from the end pulley. Where, of course, you cannot get to it, without first removing the larger (third from the end) pulley. That one is also positioned inside the frame.
My advice is to leave the third (from the end) pulley out of the installation sequence, until you have the leg extension cable properly routed through the groove in the small one.
Third, getting the leg extension cable end into its hole on what Hoist calls the "R.O.M. assembly" is difficult. See manual pages 29-31 and 55 and 61.
You have to run the cable end through the last pulley's groove and simultaneously underneath the very tightly adjacent R.O.M wheel.
I used a screwdriver to guide this cable. If you are working solo, you will find that holding the noticeably weighty leg extension assembly in the proper position requires some effort.
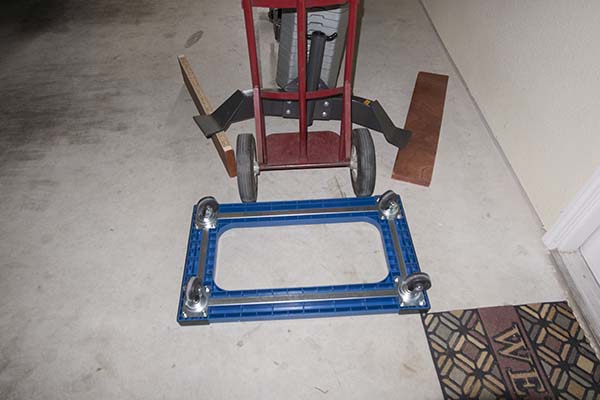
Now that everything is assembled — how does one safely get the gym off the dolly?
Once you have rolled the gym (on the dolly) to where it is going to stay, you will need to raise it high enough to scoot the dolly out from under it.
This requires that you raise both ends of the gym. A protrusion under the V5 (at about mid-length) prevented scooting the dolly out, even when I had raised the weight plate end of the gym.
I used one of my wife's small dumbbells raise the seat end. The dumbbell is taller than the wood block that I had originally used to level the V5 with the dolly under it. The grippy rubber on the dumbbell made it a little more difficult to slide than ideal. I will use something else next time.
An easier segment of the dolly-escape process comes next. You will push two blocks of wood scraps underneath each end of the gym's crosswise base (at the weight plate end).
These blocks will raise the gym completely off the dolly. You will need to measure beforehand to calculate which two objects around your home are tall enough to use for this purpose.
When preliminarily placing the blocks, leave them far enough apart that a hand truck (or a lever of some other kind) will fit between them. In the final step, the hand truck levers the gym off the blocks.
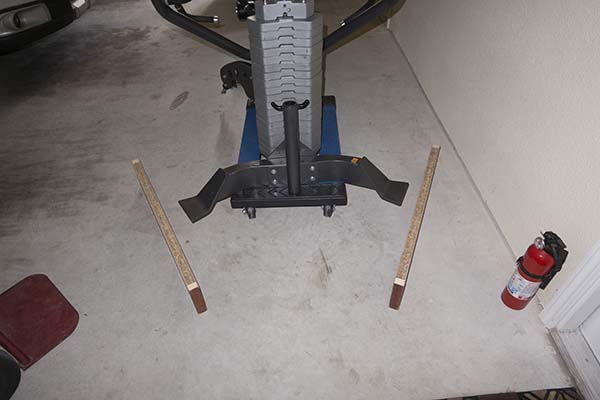
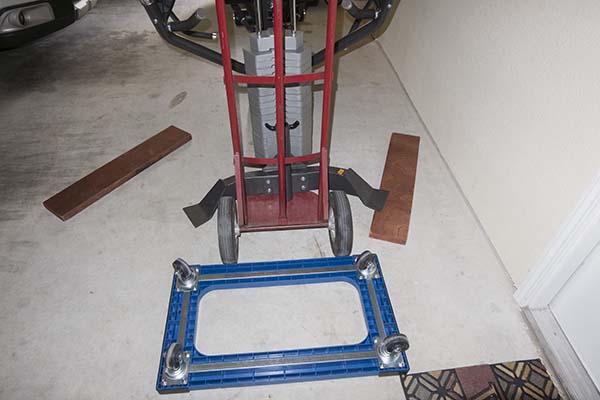
For now, use the hand truck to lever one side of the weight plate frame base upward. Push the a block under that part of the base with your spare foot. Be sure not to get your foot trapped. I doubt that I could have gotten myself out of that predicament without assistance.
Do the same thing on the other side.
The gym should now be sitting on three supports. Two at the weighted end. And one at the seat end of the gym.
Slide the dolly out from underneath the V5.
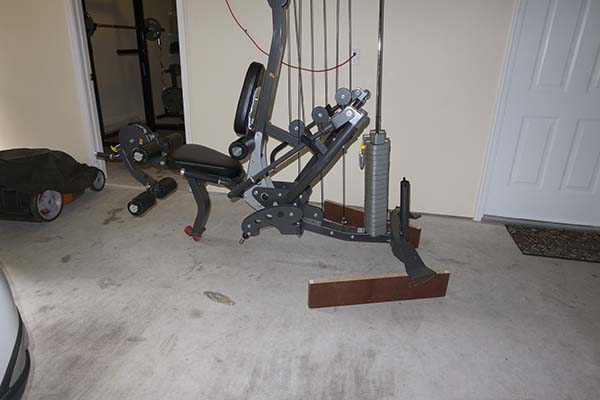
Then, lift the seat end and kick the seat-foot prop out. I did this using the hand truck. To get the leverage necessary to do this lift, I turned the dolly upside down and used it as a wheel chock. You can push on the truck from the far side of the gym and simultaneously kick the dumbbell out from under it with one foot.
The gym's seat end will now be in direct contact with the floor. Two supporting wood blocks remain at the weighted end.
You will remove these in two (declining height) steps.
If you try to drop the gym in only one step, you are likely to introduce a dangerous amount of side tilt during the drop. For example, if the gym is close to a wall, tilt in that direction may gouge the wall.
Slide the hand truck under the center of the plate-end frame base. The gym will be harder to raise this time because the hand truck is going to lever the entire mass of plate weights upward. Before you were lifting only about half this mass.
Use the dolly as a wheel chock again. You will be applying force to the hand truck while facing it. Just as you did in removing the dumbbell at the other end of the gym. Push the hand truck with one hand. You will need your other hand to (a) slide the wood block out and then (b) turn it onto its side (so as to reduce its height) and slide it back under the frame.
Go to the other side. Here you can remove the wood in just one step. There is no need to half-step this side. The gym will tilt, but not as much as it would have had you neglected to halve the height on the opposite side.
Last, remove the remaining block. The gym is (hopefully) now entirely on the floor and you are uninjured.
You can adjust the V5's lengthwise axis by pivoting its seat end.
Adjusting the weight plate end is more difficult. If you need to do this, you can insert the hand truck's shelf under the center of the base (under the weighted end) and lever it up enough to move that end side to side.
Make sure that all the bolts are tight.
The moral? — the Hoist V5 and similar gyms are tedious to move — but . . .
The V5 is excellent in use, and I think assembly and disassembly for multiple PCSs is worth the effort for people who actually will use the gym. My wife missed the V5 for the 3 years that it was in storage. Once you have the necessary sequence memorized, putting the Hoist V5 together (or taking apart) goes relatively quickly. Even while working alone.