 PeteFree.com
Gear Up OakRak — model 20095— floor to ceiling bicycle storage rack — a review
© 2017 Peter Free
05 September 2017
Looks nice — but . . .
The American manufacturer stopped short of correcting obvious and easily fixable design glitches.
This may be a good example of why some American-based companies have a difficult time displacing low end Chinese products. Too little engineering thought, combined with no post-production corrections.
That said — Gear Up's OakRak does work
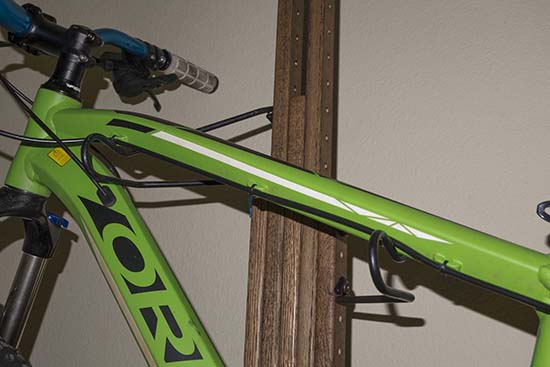
The photo shows a 14.5 kg bike (blue, bottom) and a 16 kg bike (green, top) on the OakRak.

Notice that the bicycles pictured do not sit exactly half-way (side to side) on their hangers. Their top tubes force unequal distances on each side of rack center. The blue bike, especially, unavoidably slips into the position that it is in. I faced the green bike the other way, so as to roughly balance the bottom bike's lateral shift in weight.
Ordinarily also, I would position the heavier bicycle (the green one) near the floor. But my wife needs to be able to reach and lift hers.
OakRak is designed to expand upward, so as to compress itself between floor and ceiling
To achieve this, the Rak comes in two main pieces. The longer lower portion consists of sandwiched oak rails. Each has evenly spaced, side to side holes drilled through it. The top piece has only three rails. These slip between the open end of the longer, lower portion.
You slide the top piece up and down inside the lower half, so as to the closely approximate overall ceiling height. Three threaded (headless) bolts slide through three of the holes in the sandwiched rails. Threaded hex-key caps, one on each end, secure the bolts.
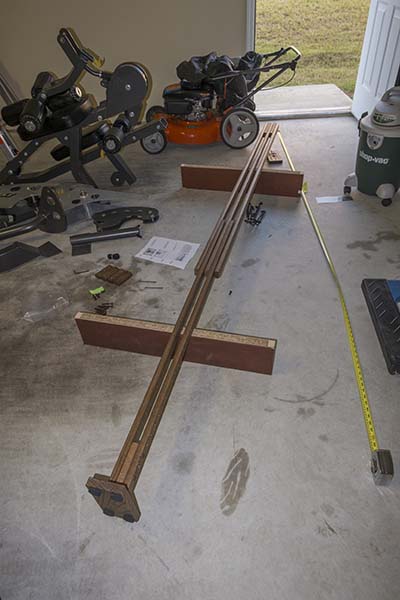
If you look closely, you can see two of the threaded through bolts on the floor just below the instruction sheet and immediately to the right of the four oak spacers. The two pieces of solid core door that the rack is sitting on are not part of it. I used those to elevate the OakRak, so that its lower and upper parts could slide into each other horizontally. That made aligning the through bolts with the correct holes easier.
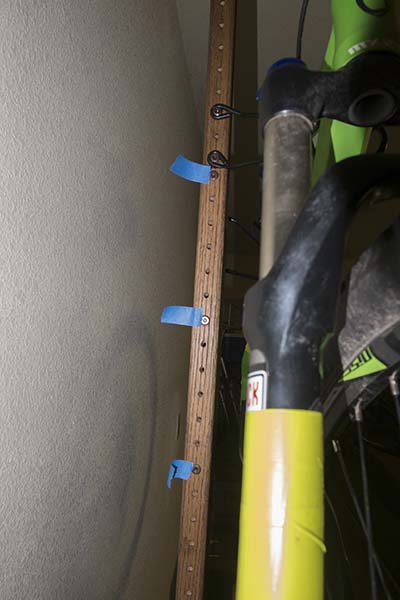
The blue painter's tape (in the below picture) shows where the through bolts and their caps are positioned in my use of it. The floor to ceiling height here is about 110 inches (9 feet 2 inches or 279.5 cm). In your application, these bolt positions will probably be different.
Once you have a Rak height that is within an inch or so of the floor to ceiling distance, you prop the Rak vertically. And then use an 8 mm open end wrench to unscrew (lengthen) the two bolt-like feet at the bottom of the rack. This process wedges the Rak into place.
However, with the kind of weight pictured (above) on it, I would not use an unsecured OakRak inside a living space. A few of Amazon's reviewers had their racks fall.
Note
When considering floor to ceiling storage solutions like this one, keep in mind that American "stick built" homes expand and contract with temperature and humidity.
They also vibrate in strong wind and with the passage of heavy vehicles. This means that the distance between floor and ceiling changes slightly with changing conditions. That means that unsecured, floor to ceiling racks may work themselves loose over time.
An obvious inconvenience
The most obvious shortcoming with the OakRak's design is its dependence on the user initially achieving a near perfect height adjustment (before the feet are leveled).
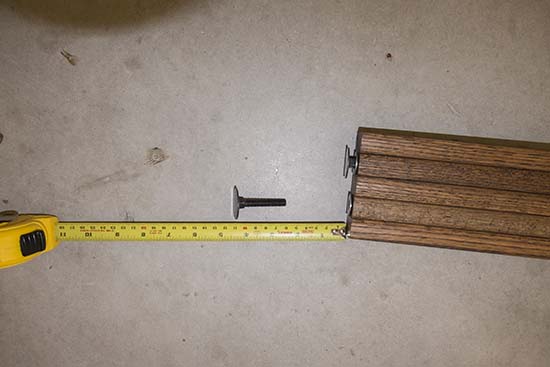
The bolts on the feet are only about 4.5 cm long. This is too short to provide much correction, when the user has connected the top and bottom parts of the Rak in too high or low a way.
This difficulty comes from the fact that the holes on the rack are spaced 1.25 inches (2.52 cm) apart. Under most circumstances, the leveler feet do not have enough length to make up for a one hole error either way. If you guess even one hole the wrong way on your initial assembly, you will have start over.
The instructions' stupidity in this regard does not help. Mine told me to measure the floor to ceiling height and then:
Thread [the leveler feet] approx. 3/4 of the way in.
Adjust total length (from top of top plate to bottom of leveler feet) to less than 1" of the actual ceiling height.
That guidance is blatantly wrong. There is a wood block that is designed to sit under the leveler feet. It is too thick to slide into place under the feet, if you ignore its measurements in the original calculation. Consequently, you have to measure the OakRak's length with the bottom block added.
Additionally, if you thread the leveler feet three-quarters of the way in (as the instructions tell you do), that further reduces your margin for error in initially guessing how long to make the rack.
I found that it was more efficient to screw the feet all the way in and go from there. The leveler heads are tall enough to squeeze a small 8 mm wrench in, even when they are flush against the metal inserts on the base of the rack.
Parade of other glitches
The leveler feet, in addition to being too short, are also arguably too wimpy for this application.
I was surprised that the instructions gave no indication of how much of the levelers' bolt shafts need to be threaded into the bottom of the OakRak.
That's crazy. You cannot support a 9 or 10 foot tall column on a wispy bolt that is only connected to the column by a few millimeters of insertion. Talk about asking for a lawsuit.
I can see why Gear Up made the leveler bolt shafts so thin. They probably were concerned that having to drill too much out of the receiving oak pieces would weaken the wood. However, in the designers' shoes, I would have frittered a little visual elegance away and constructed a beefier base. This would allow the use of longer, stronger threaded feet.
Similarly, the Rak's wood block top cap (which the instructions call a "plate") is poorly attached. It has rectangular depression designed to receive the top end of the Rak. That's a nice touch. But the only thing securing the block to the Rak is one short screw.
This design (or lack thereof) means that when you attempt to adjust the Rak to fit, the screw wiggles loose. This evidently happens, when the top block pivots slightly around the screw, during the movements necessary to position the Rak.
For example, in my first two placements, the screw loosened just enough to leave a perceptible gap between the wood block and the Rak end.
When I realized what was happening, I glued the top block into place overnight. That fixed the problem, but delayed the installation.
Top block's "compression foam dots" — represent more cheap-minded silliness
The kit includes four cheap foam stick-on pads that are supposed to protect the ceiling from marring. (You can see them in the above photograph of the rack being assembled.)
After I had installed the OakRak a few times — as I kept rearranging my garage space — I noticed that these crumbly black pads left black residue marks on the ceiling.
Their compressibility also prevented me from getting a nicely tight floor to ceiling fit.
I trashed them.
Similar shortcoming at the bottom end
The bottom block came with circular drilled depressions that are intended to position the leveler feet on the block. A nice thought.
These countersunk holes, however, were not properly placed. They were not correctly centered on the block. Nor were they axially in proper line, meaning horizontally — as opposed to diagonally — side by side. And the holes' centers were positioned slightly too far apart.
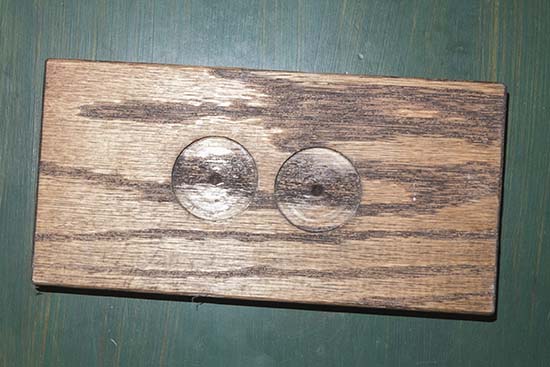
These cumulative errors caused the leveler feet to slip out (and up) on each of the holes' edges, while I was using the wrench to adjust each foot's height.
Tilt resulted when one foot climbed out of its hole and the other did not. The countersink placement defect caused the Rak to:
(a) tip away from verticality,
as well as to
(b) pivot away from being parallel to the wall behind it.
The best way to overcome this flaw is to screw each foot only one-quarter turn in alternating sequence.
Securing the top of the Rak to the ceiling — also problematic — in some applications
Gear Up appears to assume that ceiling joists are readily available in the places where someone might want to use the OakRak. The instructions say:
*Important* install bicycle rack directly below ceiling beam.
In our rental house, the garage joists run the length of the garage on 24 inch centers.
This meant that the Rak could only go somewhere along the garage head wall. And only at 24 inch intervals. Even these few possible placements were further interrupted by three people doors.
Consequently, there was no place to put the Rak in the garage, if one followed the "beam" instruction. The length of the bikes would have interfered with at least one of the doors.
What to do?
I could have put a larger top piece on the Rak's top block, so as to distribute pressure more evenly against the ceiling drywall. This would have added a poorly secured weight to the already arguably too-small top block. I envisioned the added plate popping loose and causing injury.
Another method would have me drill a couple of holes into the top block and then screw those into one of four different kinds of drywall anchors. The problem with this solution (for my situation) was that housing management here does not allow the addition of "fixtures" in its homes. (Drywall anchors of most kinds are difficult to remove, without leaving signs of their former presence.)
So, I drilled holes through the top block and screwed it directly to the drywall. These holes created no more damage than hanging a picture might have.
My reasoning (with this half-assed solution) is that the screws' only purpose is to keep the Rak's top block from shifting laterally out of vertical true.
The screws do not need to bear much weight. Resistance to lateral movement — provided by the thickness of the sheetrock as it is exerted against the screw shaft — should be enough to keep things in place.
But you probably shouldn't try this at home.
Lack of thought — in the bike hangers' design
The bike support hangers exhibit flaws of their own:
Even the too-short hex key wrench (that comes with the Rak) hits the hanger, when you try to screw it into place on the oak frame. This means that you have to remove the wrench about three times for each go-round. That quickly gets tedious.
Second, the screw head is almost too small for the looped opening that it is supposed to secure.
And third, the hangers are too shallow to hold mountain and downhill bikes with certainty.
Each of these annoyances is so obvious (and so easily fixed with a redesign) that one wonders why Gear Up has not done anything to correct them.
Three tips — on other aspects of installing the OakRak
I positioned mine about 23 cm (roughly 9 inches) away from the wall behind it.
This allowed me to:
(a) line up the holes of the "spacer blocks" — which go inside sections of the Rak where you are going to attach a hanger
and
(b) exert better wrench leverage, when screwing the hanger to the rack.
Second, you will have to anticipate how much distance each bike will require on each side of the rack. As I indicated at the outset of this review:
The two bikes pictured do not sit exactly half-way on the hangers. Their top tubes forced unequal distances on each side of center.
The blue bike, for example, slips into the position it is in. I turned the green bike the other way, so as to approximately balance the shift in weight.
If you conclude that moving the OakRak is an irritating process — as I did — give yourself more leeway on each side of the rack than you think you might need:
Initially, I halved the length of each bike and added 15 cm (about 6 inches), so as to clear garage objects on either side of the rack.
These fifteen centimeters turned out not too little. I wound up adding 23 cm total (about 9 inches) on each side. That worked, and I did not have to move the Rak again.
Third — when it comes time to figure out where to put the hangers (for sloped tube bikes) — you will need to hoist the bike against the OakRak. If you don't, calculating where the first hanger should go will be difficult. The hangers sit higher on the rack than the supports do on the bike.
One nice thing, however, is that once you have both hangers properly placed, you can measure the distance (or count the holes) between them. After doing that, you can reposition this particular bike wherever you want it on that (or another) OakRak.
Too-short hook and loop straps
The OakRak comes with two Velcro-like straps. These are intended to secure each bike's front wheel, so that it does not flop when placed on the rack.
However, the straps are much too short to work with mountain bikes and shock-equipped hybrids. Which basically means the majority of bikes on the market.
This is a good example of stupidity's complacence. (And we complain about China's products?)
Hole alignment is great
The OakRak's holes line up perfectly with each other at all levels.
Although I had to take my OakRak apart a few times — to get it to fit on alternate sides of my noticeably height-varying ceiling — its perfectly aligned holes made the process easier than it might have been.
The moral? — With an eye to avoiding its shortcomings . . .
The OakRak appears to work well enough
If I were the manufacturer, though, I would be concerned about its potential for failure, when in understandably inexperienced hands.
Screwing the top block/plate into the ceiling should be mandatory — not optional, as Gear Up says it is.
I also question whether this mildly wobbly rack would be sufficient to hold two downhill-heavy mountain bikes.
Certainly, if used inside a living space and unsecured to the ceiling, I would confine OakRak's use to lightweight road racers. Which, judging by the picture on the instruction sheet and the too-short hook and loop straps, appears to be what this floor to ceiling rack was originally designed for.
Even in light of the above caveats, I might buy another OakRak for garage use. This willingness may explain Gear Up's complacence with regard to suitably improving this product.
Lacking pride, manufacturers often do what they can get away with. American companies included.