 PeteFree.com
Baby Lock BL9 — You Can Do Upholstery with an Ordinary Home Sewing Machine — Review
© 2012 Peter Free
09 June 2012
Baby Lock’s BL-9 was not ideal for reupholstering a heavy fabric Queen Anne wingback recliner — but it eventually got the job done
I wrote this review to supplement the lack of Internet information about the compatibility of home sewing machines with reupholstering.
Our local sewing machine retailers, with one exception, were equally ignorant. Most vendors’ knowledge about sewing machines is confined to ordinary sewing uses and quilting.
Upholstery raises the question whether the machine’s guts and motor are tough enough to handle heavy fabrics, combined with piping, multiple layers, and comparatively tightly curved corners.
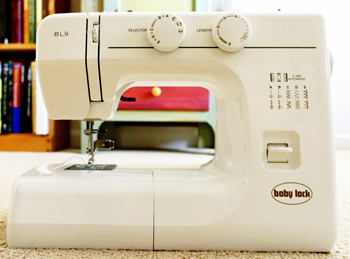
Enter Chris at Myers Sewing Machine Company in Colorado Springs and the store’s bottom of the line Baby Lock BL-9.
Chris told me the inexpensive BL-9 would work, although it would not be as efficient as a $2,000 machine explicitly designed for upholstery use.
The BL-9 did work, but it proved frustrating to use with the perfect storm of materials I threw at it.
I think that, had I been more reasonable in my choice of materials, the BL-9 would have done well.
Why I chose the Baby Lock BL-9
I have no use for the plastic parts that most manufacturers today hide inside their sewing machines. Under upholstery use, these are going to strip almost immediately.
The BL-9, however, uses metal innards. Meyer’s showed me a machine with its cover removed.
The BL-9 model sits at the bottom of the Baby Lock line. According to Myers, Baby Lock’s more expensive models include sophisticated sewing features that appeal to competent sewers, but do not improve on the BL-9’s stoutness.
That was good enough for me.
This review is only about the BL-9’s capacity for upholstery
Though I have some sewing knowledge, mostly gained by watching my dress designer mother work decades ago, my limited interest in sewing is predominantly focused on being able to do some furniture and automotive reupholstery.
My comments on the BL-9 are confined to that application.
I am not competent to comment on the Baby Lock in relationship to most users’ home sewing requirements. All I was trying to do was sew layers of heavy fabric and piping together (from the invisible inside) for use on a chair. Consequently, the aesthetic quality of the seams did not much matter, although their strength did.
The BL-9 in upholstery use — was frustrating under the conditions I foisted on it
The chair that I just completed with the Baby Lock is a 15-year old Lane Furniture reclining wingback in Queen Anne style.
Had I stuck with the weight fabric that Lane originally used, I probably could have avoided challenging the BL-9’s capacity. But my wife and I could only agree on a pattern that turned out to be one of Crypton’s premium grade upholstery fabrics.
Problem One
My first comeuppance derived from the fact that the fabric we chose was significantly thicker, more stretch-resistant, and notably more needle-resisting than the original Lane fabric.
Note
I bent stout upholstery pins in pinning even two layers of the material.
In trying to penetrate four layers, I had to use the palm of my hand to push the pins through.
And it took persistence and sweating effort to get curved (hand used) upholstery needles to penetrate the finished product.
Problem Two
“Ignorant Me” compounded the thick fabric problem by deciding to use as many of the original Lane materials as I could. This included trim piping that was at least 2mm thick and made of comparatively incompressible plastic.
Problem Three
I used non-bonded Coats Extra Strong upholstery thread.
Being unbonded, the Coats thread experienced more resistance to going through the Crypton fabric than bonded size v69 nylon or polyester does.
The Coats thread also is memory-retentive enough to retain the shape of its coils on the bobbin. That proved to be a problem in creating thread tangles. In fairness, even the quality thread that I used later in the project could not surmount the combined difficulties I challenged the machine with.
The perfect storm of materials and curved seams in action
The three above-listed problems combined to overwhelm the BL-9 under the numerous situations in which I asked it to seam four to (occasionally) six layers of fabric, with attached plastic piping, around curves.
Note
The numerous layers were the result of the tucks and folds that some of the curved seams required.
Going around three-dimensional turns with stiff fabric is considerably more difficult than it is with thinner, more flexible cloth.
Even with properly adjusted thread tension — and with a very narrow presser foot — the machine did not have the power (even with my hand-pulling assistance) to pull and needle drive consistently enough to avoid bobbin thread tangles.
In these situations, the BL-9 would metallically crunch to an instant halt. The stomach-dropping sound gets your attention.
In most of these instances, the bobbin thread had tangled with the needle thread. I had to cut these messes (dozens and dozens of times) to pull the needle up enough to remove the fabric and restart the sewing process.
Notably, the tangles occurred with cheap and with quality thread.
Note
Toward the end of the project I substituted bonded v69-size nylon thread for the Coats unbonded polyester. The substitution only made an obvious difference on straight seams. It made none where the BL-9 did not have the power to cope with multiple layers and piping in curves.
Source of the tangles and stopping problem?
I am guessing that the BL-9’s lack of power (for upholstery) is the culprit in creating these tangles and stoppages.
This is not a criticism of the machine. The materials that I threw at it are why commercial upholstery machines are manufactured.
Note
I looked at a commercial upholstery machine at Meyers. Its motor is mounted to the underside of the table that comes with it. The motor’s size literally dwarfs the one in the BL-9.
A couple of unrelated, minor criticisms of the BL-9’s design — these may also apply to ordinary sewing uses
I have two criticisms here. The first has to do with the design of the bobbin compartment. The second with the reverse switch.
I became intimately familiar with the BL-9’s bobbin compartment. Its design is mildly obnoxious, if you have to frequently disassemble it to clear tangles.
To understand the bobbin explanation, look at the diagrams on page 42 of the BL-9 Instruction and Reference Guide, here.
What Baby Lock calls the bobbin compartment “hook” is held inside only by friction of oiled steel on steel.
The hook is item number 4 on the diagram on page 42 of the BL-9 Instruction and Reference Guide.
For people with big hands or fat fingers, the hook is difficult to fit properly into the “hook race.”
The hook race is item number 5 on the page 42 diagram.
Part of the challenge in properly positioning the hook lies with the distance that the machine’s needle plate juts forward over the bobbin compartment opening.
The needle plate is item 12 on page 4 (not 42) of the BL-9 Instruction and Reference Guide.
This overhang makes it is difficult to see what you are doing, when you are seated in an ordinary sewing position. And the overhang makes it difficult for large fingers or hands to flex precisely enough to seat the hook properly.
Another challenge lies in aligning the hook with its correct (but undesignated) position in the hook race. If alignment is not perfect, the hook topples out every time. This happens before you can secure it with the slightly persnickety hook race ring and hook race holders.
The ring itself has a protruding stem on its base that makes it easy to see how it is supposed to fit in the bobbin compartment. But inserting it properly, without nudging the tenuously perched hook into falling out of the hook race, takes more than a bit of care.
All told, the design of the bobbin compartment is the BL-9’s least appealing feature.
The second design flaw could easily have been avoided. It is the fact that the reverse switch has to be held down while reversing.
When handling layered and heavy materials, it would have been very useful to have a reverse switch that can be locked in the reverse position. Such a design would allow the user to control fabric feeding with both hands.
As it was, I often went off what I intended the seam track to be, when using one potentially controlling hand to keeping the reverse lever in the down position.
The instruction manual — is better than some, but occasionally poorly ordered and less than clear
The manual’s slight weakness will not bother experienced sewing machine users. But it serves as an example of what happens when experienced people forget what inexperienced people don’t know.
The manual has 3 significant shortcomings for first time users:
(i) lack of complete clarity about the step by step sequence involved in threading,
(ii) an inadequate explanation of how to “draw up” the bobbin thread,
and
(iii) an unnecessarily confusing explanations of stitch tension, the difference between top and bottom threads, and how to control their appearance.
In regard to the first criticism, instead of proceeding in chronological order in addressing how to thread the machine’s needle and bobbin, the manual tells you how to remove and insert the bobbin case — without talking about the bobbin itself.
On the next page, you do learn about winding the bobbin — but not about putting the bobbin case back into the bobbin compartment.
In other words, the manual inexplicably avoids giving the step-by-step presentation that most people would expect.
Similarly, the instruction manual addresses “drawing up [the] bobbin thread” in an opaque way.
Instead of showing a picture of how this works, or telling you to open the bobbin compartment cover to see what actually happens, the manual expects the new user to miraculously know what it means by the sentence, “Lightly draw up the needle thread forming a loop of bobbin thread.”
I had forgotten how this process works. So, I had to figure it out by taking a look at how the moving needle thread essentially circles clockwise around the bobbin compartment, until it catches the bobbin thread and draws it up through the needle plate, when the needle completes its upward cycle.
What the manual does not tell you is that — if you don’t stop turning the machine’s hand wheel and simultaneously catch the bobbin thread on top of the needle plate — you’re going to get a bobbin compartment tangle.
It would have been clearer to tell first time users to open the bobbin compartment cover and to watch the needle thread catching the bobbin thread and drawing it up.
If one does this, it becomes obvious that you have to draw the bobbin thread, just as soon as the small loop appears on top of the needle plate. If you mistakenly expect the needle to do all the work, by continuing to turn the hand wheel, you’ll get a mess.
Third, the manual’s explanation of properly adjusting thread tension explanation is obtuse.
It does not start at the logical place by showing the first time user what a properly stitch-tensioned seam should look like.
Nor does it competently explain how to distinguish the top (needle) thread from the bottom (bobbin) thread, when they are both the same color. The provided diagrams (unavoidably) compound this confusion by showing white top thread and black bottom thread.
An experienced user will already know these things. But experienced people are not those who will be buying an entry level machine like the BL-9, either.
One outstanding good point — durability?
On my upholstery job, despite a stomach-churning number of crunching lock-ups, the BL-9 impressively did not skip a durability beat.
Conclusion — Baby Lock’s BL-9 is recommended for light upholstery work
My verdict is that home sewing machines can do upholstery. But I would not do a lot of upholstery with one. Nor would I use a machine that uses plastic parts in its gear train.
As I demonstrated with my project, the BL-9 will work with comparatively heavy materials. Provided that the user is willing to progress by 1 or 2 millimeters between stoppages along curved seams.
No matter how carefully I approached each curve, I had to clean bobbin compartment tangles every few seconds.
My curved seams’ only virtue was that the needle’s stalled progress put a bunch of stitches where only one should have gone. A strong, but ugly result. Since these abominations were hidden inside the completed project, their lack of aesthetic appeal did not matter. People tell me that the completed chair looks professionally done.
Despite the BL-9’s triumph in completing the inadvertently machine-challenging project — without breaking down — my advice is that, if you are going to do a lot of upholstery work that uses moderately heavy materials, buy a commercial upholstery sewing machine.
The heavy fabric wingback project took me literally at least a dozen times longer than it would have — had I used a machine that had the power to keep stitching (without skipping a beat), when it encountered up to 6 layers of heavy material and immediately adjacent incompressible piping.
In sum, power has advantages. That’s why the commercial upholstery machine that Meyer’s Sewing Machine Company showed me had an industrial-sized motor bolted to the underside of the machine’s supporting table.
In regard specifically to the Baby Lock BL-9, spending more on an ordinary sewing machine for upholstery duty is probably a waste of money. Nor would I buy a competing brand with their penchant for using plastic internals. Meyers hooked me with the cutaway display of the BL-9 that showed its metal guts.